
Step-by-Step Guide to Deploying Flux Docker Image
In this step-by-step guide, we'll teach you how to deploy and use a Flux Inpaint docker image with just a few clicks on MonsterAPI.

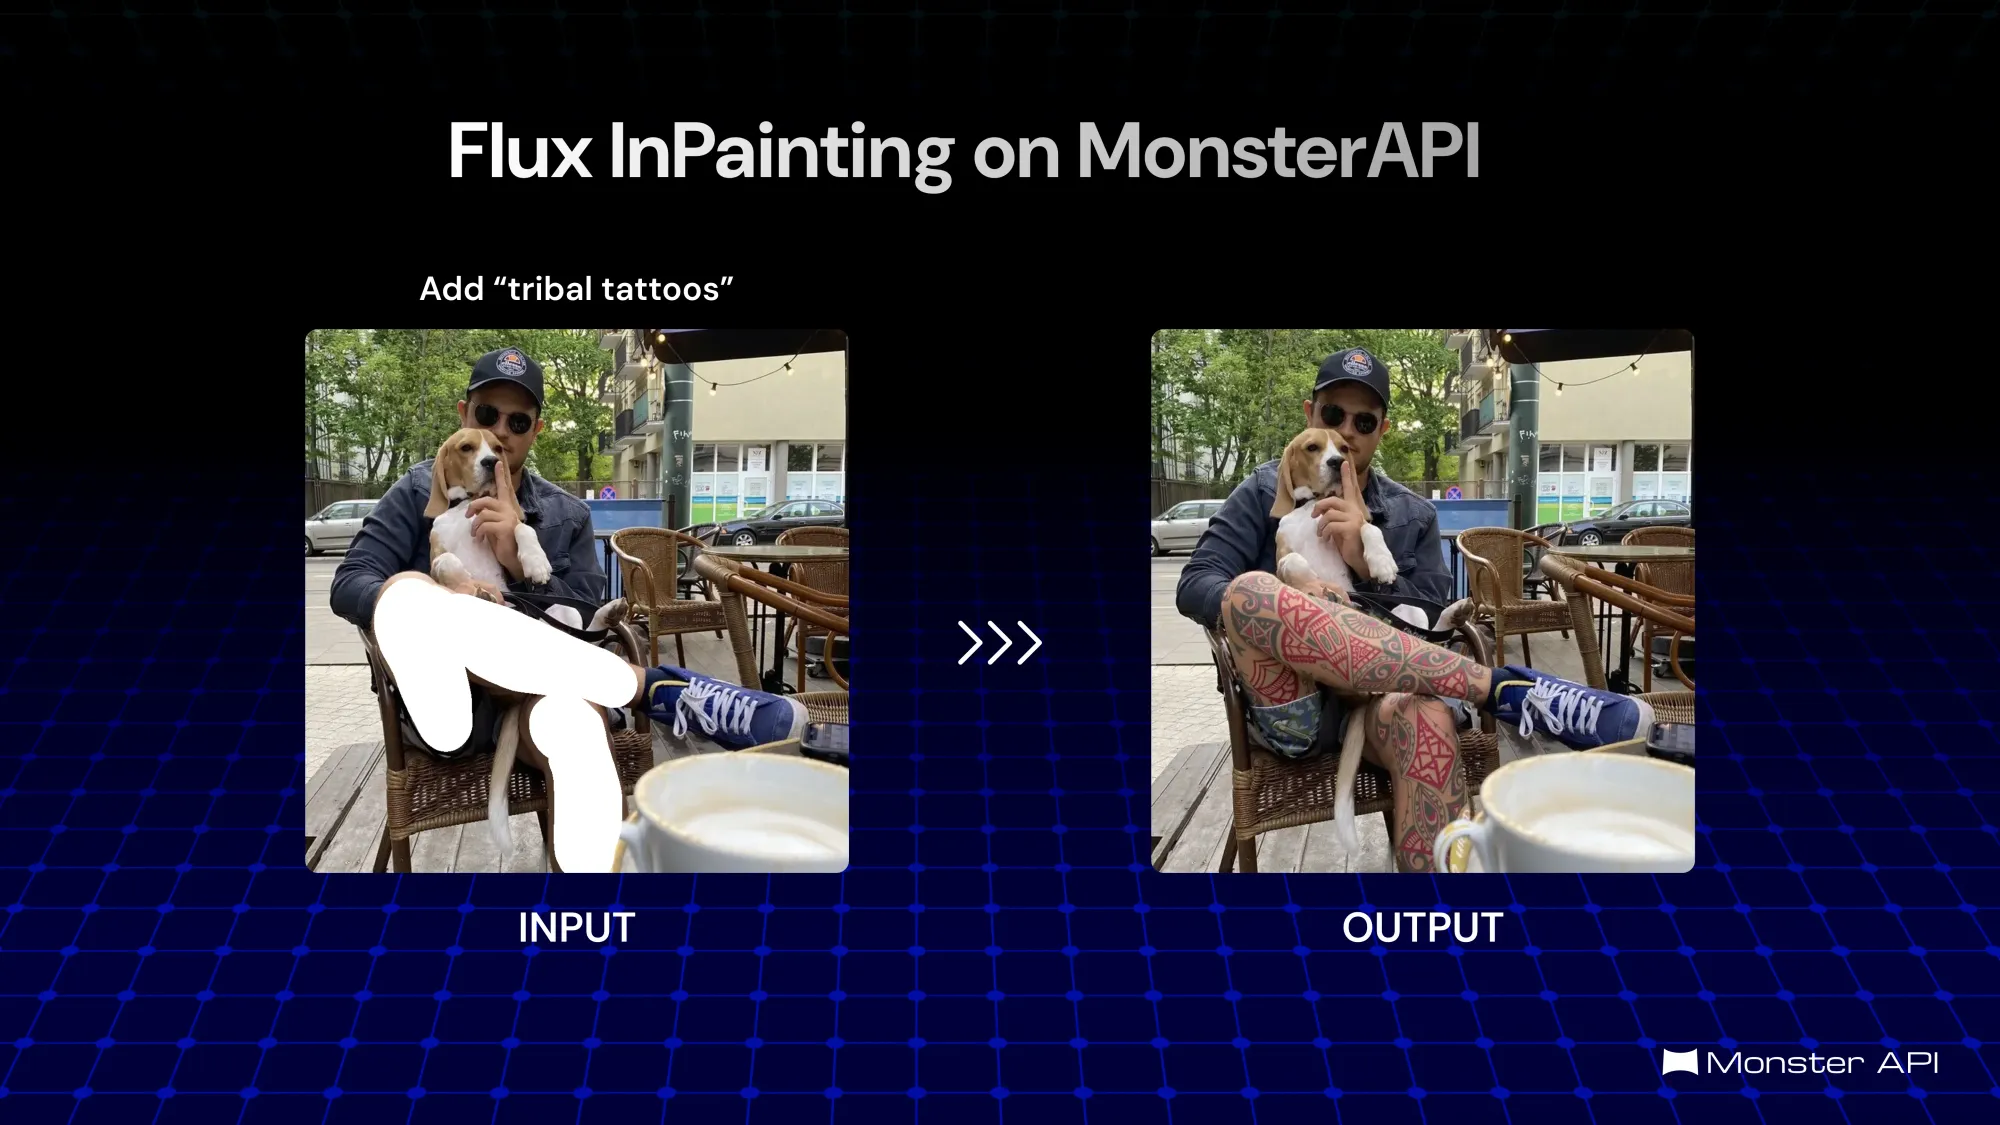
Flux-Inpaint, powered by the FLUX.1 model from Black Forest Labs, specialized in image inpainting—replacing or generating parts of an image that may be missing, damaged, or intentionally masked.
It’s perfect for applications like restoration, photo editing, and creative transformations. Leveraging state-of-the-art AI, Flux-Inpaint provides users with a highly creative tool for artistic image manipulation.
In this blog, we’ll guide you through the process of deploying the Flux-Inpaint Docker image on MonsterAPI.
This tutorial is designed to provide a seamless experience for hosting and using Flux-Inpaint entirely through MonsterAPI’s cloud infrastructure, without requiring local machine resources.
What is Flux-Inpaint?
Flux-Inpaint is an advanced AI model designed for image inpainting. With Flux, you can fill missing or corrupted areas in images with generated content. Whether you're repairing old photographs or creating new visual content, this tool seamlessly blends new image data with existing visuals for a professional result.
By deploying Flux-Inpaint on MonsterAPI, you can harness the power of this model without dealing with the complexities of managing servers.
MonsterAPI’s cloud-based infrastructure ensures high performance, scalability, and reliability, allowing you to focus entirely on your creative work without worrying about hardware limitations or setup challenges.
Benefits of Using Flux-Inpaint on MonsterAPI
- Seamless Deployment: With MonsterAPI’s intuitive one-click deployment interface, deploying the Flux-Inpaint Gradio UI is as simple as a few clicks.
- Scalability: MonsterAPI's cloud infrastructure allows you to scale resources as needed, ensuring optimal performance for your image inpainting tasks.
- Reliability: MonsterAPI offers high availability for your deployments, ensuring that your applications are running smoothly and with minimal downtime.
- Ease of Use: Deploying Docker images on MonsterAPI eliminates the need for local setup and configuration, saving you time and effort.
- GPU-Powered: MonsterAPI provides access to powerful, cost-effective GPUs, ensuring that your inpainting models run efficiently and quickly.
Prerequisites
Before getting started, make sure you have the following:
- MonsterAPI Account: Create and activate your account on MonsterAPI.
- Docker Image: The Docker image we’ll use is kuberishh/inpainting-segment:latest.
- Service Port: The Flux-Inpaint Docker container will be configured to run on port 7860.
One-Click Deployment on MonsterAPI
Deploying Flux-Inpaint on MonsterAPI is simple and fast. With one-click deployment, you don’t need to worry about complex configurations, infrastructure, or managing hardware—MonsterAPI does it all for you.
Step-by-Step Guide to Deploying Flux-Inpaint on MonsterAPI
Step 1: Log in to MonsterAPI
Start by logging into your MonsterAPI account. Navigate to the dashboard, where you can manage your deployments.
Step 2: Create a New Deployment
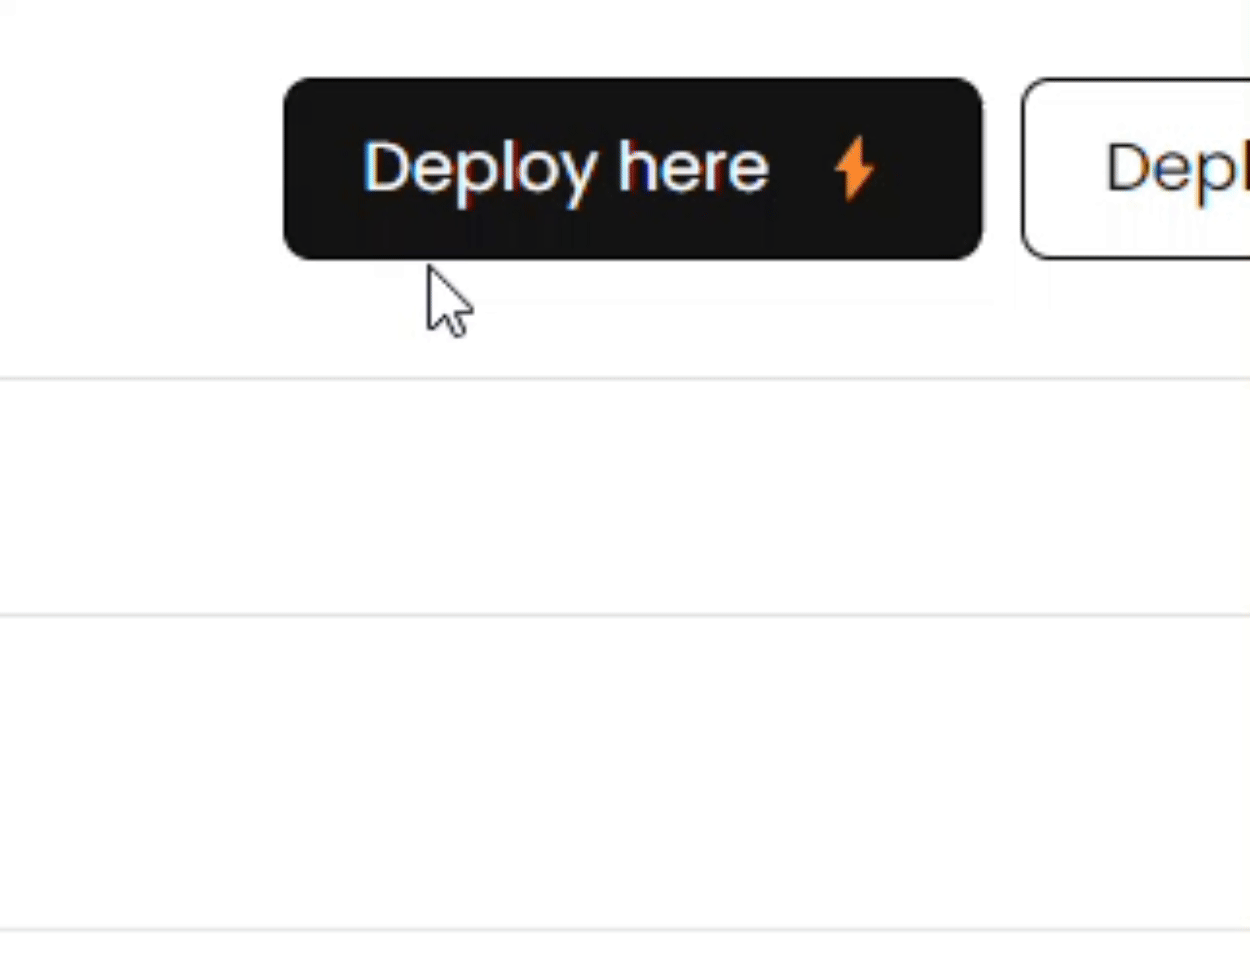
- Navigate to the Deploy section by clicking here.
- Create New Deployment: Click on the "Deploy here" button and then choose “Deploy a Docker Image”.
Step 3: Configure the Deployment
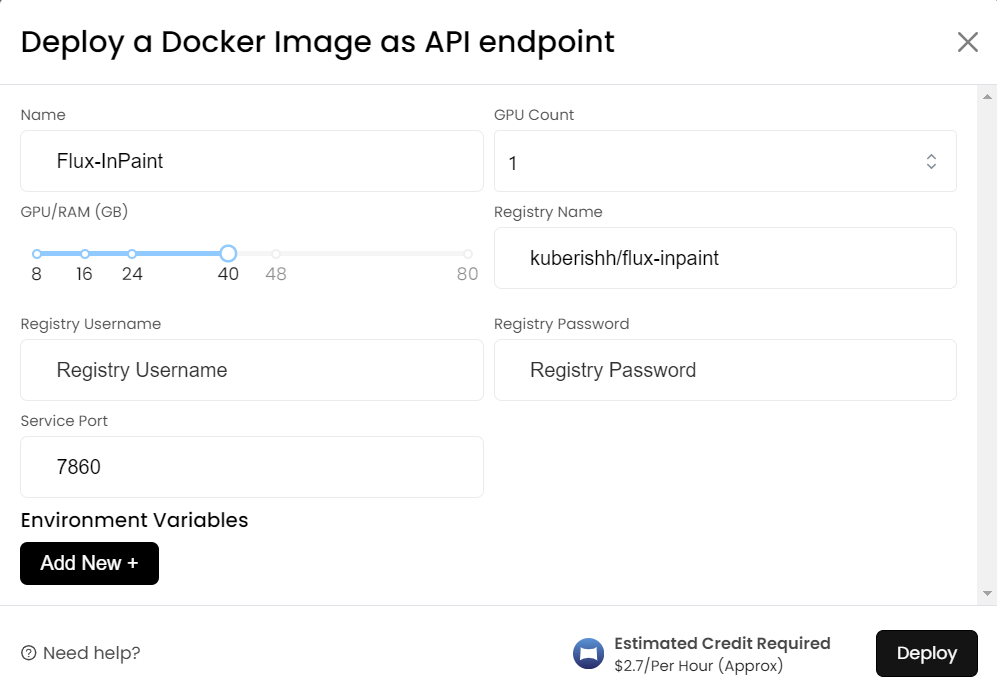
- Name Your Deployment: Provide a meaningful name for your deployment, such as "Flux-Inpaint".
- Select Docker Image: Under Registry Name, enter `kuberishh/flux-inpaint:latest`.
- Set the Service Port: Configure the service port to 7860 to ensure the Flux-Inpaint application runs on the specified port.
- Advanced Settings (Optional): If there are any advanced settings specific to your use case, configure them accordingly. For most users, the default settings should suffice.
Step 4: Launch the Deployment
- Review Configuration: Double-check all the configurations to ensure everything is set correctly.
- Deploy: Click on the "Deploy" button to start the deployment process. MonsterAPI will now automatically orchestrate a GPU server launch and deploy a Docker container with the above-specified Flux-Inapint Docker image and host it at the specified port for access.
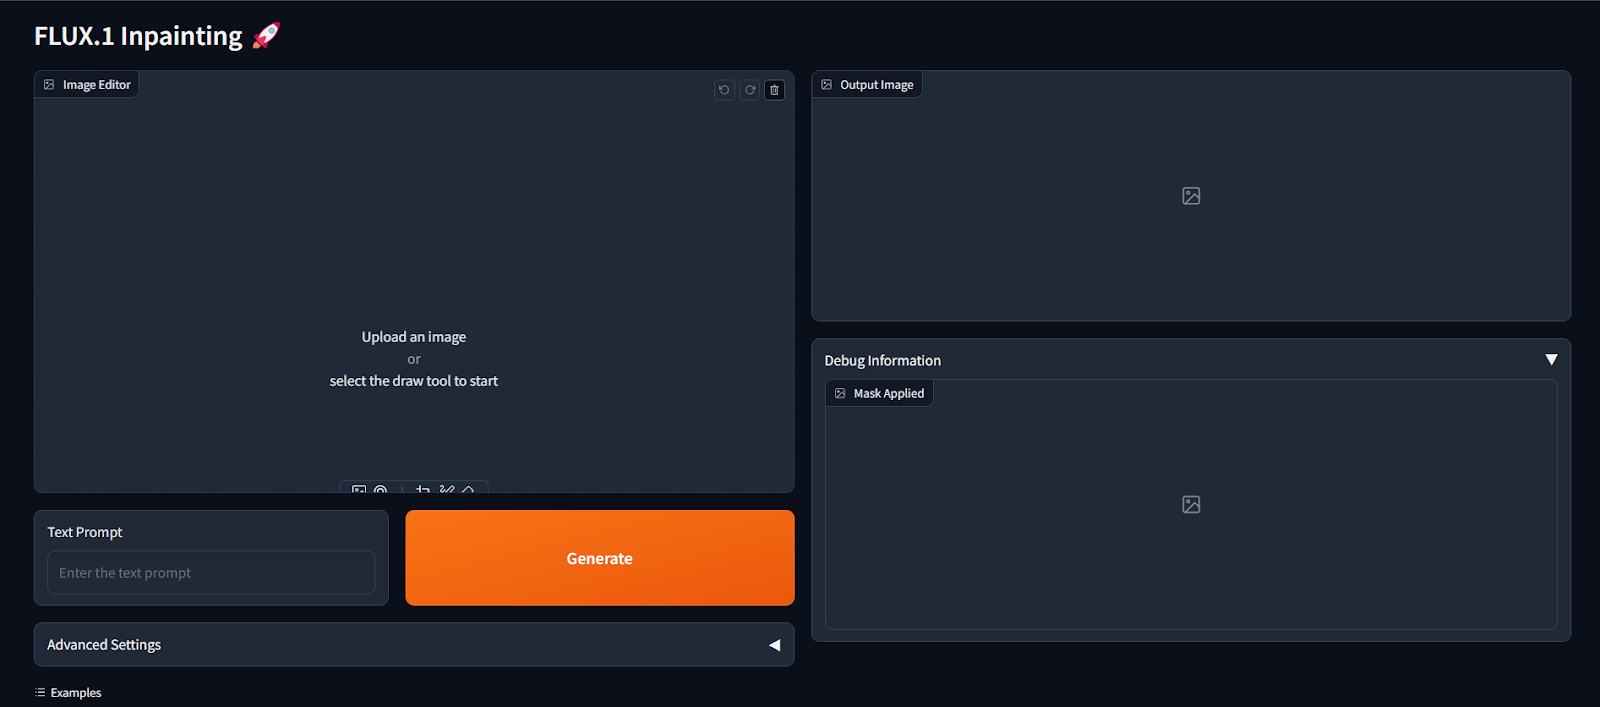
Step 5: Access the Flux-Inpaint Web Interface
Once the deployment goes live (usually takes 15-20 minutes), you will be able to access the Flux-Inpaint interface by clicking on the “Open API Endpoint” button on your deployment’s dashboard.

The URL will look like this: https://<your-deployment-id>.monsterapi.ai
Conclusion
Deploying Flux-Inpaint on MonsterAPI allows you to harness powerful inpainting capabilities without the hassle of setting up infrastructure.
With just a few clicks, you can deploy the Docker image, draw masks, and generate new image content based on your prompts—all from the cloud. This streamlined workflow not only saves time but also provides high-performance image generation for a wide range of creative and professional use cases.
Ready to get started? Deploy Flux-Inpaint on MonsterAPI today and experience the future of AI-driven image transformation.
For further assistance, check out our documentation or contact support.